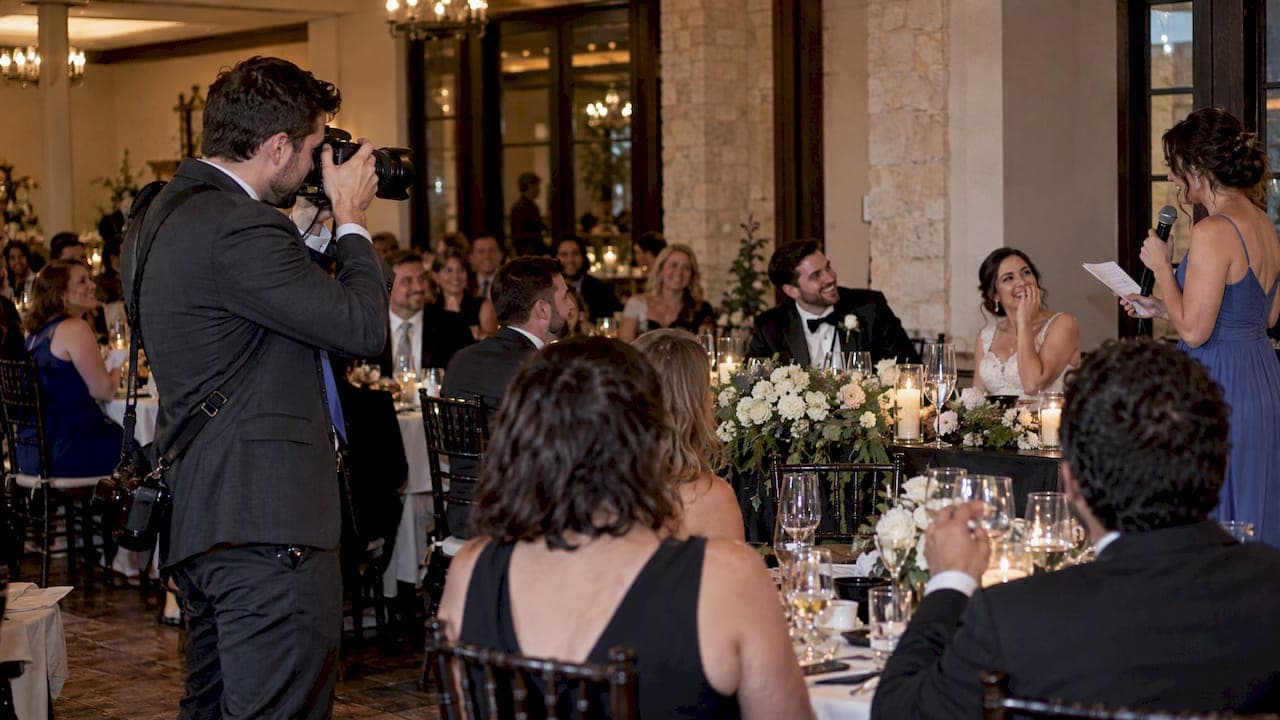
Cover the reception by protecting what can't be restaged first: entrances, toasts, and first dances. Treat shutter speed and flash power as two separate dials, one for the room's mood and one for your subject's exposure. During toasts, chase the reactions on people's faces, not just the person holding the microphone.
TL;DR:
- Before guests arrive, confirm the toast order, first dance cue, flash restrictions, and safe light stand locations with the planner, DJ, and venue staff.
- For toasts, stand near the speaker but angle toward the head table, and keep the lens on the couple and family rather than the microphone.
- Set shutter speed to retain ambient color, then adjust flash power separately for subject brightness; if the shutter speed causes blur, raise ISO instead.
- A solo photographer should cover the entrance, toasts, first dance, parent dances, and open dancing first, then use quieter lulls for details and candids.
- A wide zoom covers the room and entrance, while a fast prime suits dim dance floors and candid shots once reception lighting drops.
Table of Contents
- Reception essentials and timeline: where to be and what to expect
- Key moments to prioritize and how to protect them
- Lighting and camera settings: balancing ambient and flash for reception mood
- Lenses and gear choices for receptions
- Off-camera lighting setup and practical tips
- Shooting movement and dances: composition and camera technique
- Reception workflow, shot lists, and practical shot ratios
- Practical lessons from field experience
- How a professional wedding photographer protects your reception moments
- FAQ
- Selected reference links and internal resources
- Sources
Reception essentials and timeline: where to be and what to expect
A typical reception moves through a predictable sequence: grand entrance, cocktail hour or dinner service, toasts, first dance, cake cutting, then open dancing. Knowing that order ahead of time lets you plan where to stand and when to move, instead of scrambling.
Start wide at the entrance to capture the whole room reacting as the couple walks in, then tighten your framing as the night progresses and moments get more personal. Toasts call for a position near the speaker but angled toward the head table, so you catch both the speech and the faces listening to it.
Before the event starts, talk through the run of show with the planner, DJ, and venue staff:
- Confirm where light stands can sit without blocking sightlines or walkways.
- Ask the DJ for a rough toast order and first-dance cue timing.
- Check with the venue about any restrictions on flash or stand placement near the dance floor.
Key moments to prioritize and how to protect them
Non-repeatable moments are the ones you cannot ask anyone to do again: the grand entrance, the vows during toasts, the first dance, the parent dances, the bouquet toss. A missed detail shot can be recreated later. A missed reaction during a father-of-the-bride speech cannot.
A simple protect-first workflow keeps you from losing these moments to a dead battery or a bad angle:
- Identify every non-repeatable moment on the timeline before the reception starts.
- Assign a primary photographer to each moment and a backup angle if you're working with a second shooter.
- Position yourself where you can see faces, not just backs of heads, before the moment begins.
- Stay on that moment until it's fully resolved, then move to the next priority.
During toasts, frame for reactions first. A practical approach is to prioritize frames of the couple and family reacting over frames of the person speaking. The speech is forgettable in a photo. The look on a mother's face while her daughter reads a letter is not.
Pro Tip: Pre-focus on the head table before the first speaker stands up, so you're not hunting for focus when the emotional moment hits.
Lighting and camera settings: balancing ambient and flash for reception mood
Shutter speed and flash power do two different jobs, and beginners often treat them as one setting when they should be two. Shutter speed controls how much ambient light the sensor records, meaning the warmth of string lights or a DJ's uplighting. Flash power controls how bright your subject appears, independent of what the background is doing.
A few starting points for common reception lighting:
- Table and dinner lighting: Choose a shutter speed, aperture, ISO, and bounced flash power that suit the room and your subject.
- Dim dance floor: Use a shutter speed that preserves ambient color and point the flash off-axis to avoid flat light.
- Mixed-color stage lighting: Use a slower shutter to let the colored wash register instead of getting swallowed by flash.
Practitioners treat shutter speed and flash power as independent controls, adjusting shutter for ambient mood and flash for subject exposure separately rather than chasing one exposure value.
If your shutter speed drops below what you can handhold without blur, raise ISO before you drop shutter further. Modern cameras can often handle higher ISO settings for reception work, and a slightly noisy frame beats a blurry one.
Lenses and gear choices for receptions
Start wide for the venue itself. A wide zoom covers the room, the decor, and the entrance without forcing you to back into a wall.
Once the lights dim and the candid moments start, fast primes earn their keep:
- A wide-angle prime is useful on cramped dance floors where you can't step back.
- A standard prime works well for mid-distance candids at tables and during toasts.
- A longer prime compresses a crowded, open dance floor into tighter frames.
Bring a second camera body if you can, along with spare batteries and extra memory cards. A reception runs for hours, and a dead battery during the first dance is not a problem you get to solve twice.
Off-camera lighting setup and practical tips
A simple off-camera lighting setup can cover many receptions without turning the room into a studio.
- Place one light behind or beside the couple as a rim light to separate them from the background.
- Add a second light off to the side as fill, angled so it doesn't compete with the DJ's stage lighting.
- If you only have one light, mount it on a stand near your shooting position as a key light and bounce it off a nearby wall or ceiling.
- Sandbag every stand and keep them out of walking paths, especially near the dance floor entrance.
- Walk the room with the planner or DJ before guests arrive to agree on stand placement.
Use gels on your flash heads to match the venue's ambient color, or lean on TTL metering for a quick starting point before switching to manual for consistency once you've dialed in your settings.
Pro Tip: Move light stands during natural lulls, like when the DJ switches songs, so you're never adjusting gear during a moment you're supposed to be shooting.

Shooting movement and dances: composition and camera technique
Dance floor shots split into two looks: frozen action and motion blur, and both have a place in a reception gallery.
- Use a fast shutter to freeze a spin, a dip, or a lift at its peak.
- Use a slower shutter with a slight pan to turn fast movement into deliberate motion blur.
- Watch for anticipation cues: a partner's hand tightening before a lift, a shift in weight before a turn, and position yourself there a beat early.
- Use negative space and the venue's own lights for rim separation, placing dancers against darker backgrounds when possible.
- Switch to continuous autofocus and burst mode once the dance floor fills, since single-shot focus will fall behind fast movement.
Reception workflow, shot lists, and practical shot ratios
A single photographer working a reception should move through priorities in order: entrance, toasts, first dance, parent dances, open dancing, then details and candids during lulls. With two photographers, one covers the main subject while the second works reactions and candids from a different angle.
- During toasts, prioritize reaction frames over frames of the speaker.
- During the first dance, shoot in short bursts at key moments like dips or spins rather than holding the shutter continuously.
- During slower stretches, work through a quick checklist: table details, guest candids, decor, and any unused détail shots from earlier in the day.
Practical lessons from field experience
A groom's father once stepped away from the head table shortly before his toast, and the only usable frame of his reaction came from staying locked on that seat instead of the microphone. That one habit, keeping a lens trained on faces before anyone speaks, has saved more shots than any piece of gear. A consistent bag layout, same pocket for the same item every time, means never fumbling for a card change during a first dance.
— Todd
How a professional wedding photographer protects your reception moments
Hiring a professional means the entrances, toasts, and first dances get covered, since they don't come back. Wedding photography and videography options are available for a more complete record of the day. If you're planning a wedding and want those moments handled for you, our wedding photography services page has the details.
FAQ
What's the most important thing to capture at a wedding reception?
Focus on moments that cannot be restaged, especially the grand entrance, toasts, and the first dance. Reactions from family and the couple carry more emotional weight than a wide shot of the speaker alone.
How do I balance flash and ambient light at a reception?
Set your shutter speed to control how much of the room's existing light, like string lights or uplighting, shows up in the frame. Then set flash power separately to properly expose your subject, since the two settings serve different purposes.
What lens should a beginner use for reception photography?
Start with a wide zoom for venue and decor shots, then switch to a fast prime once the lighting drops for the dance floor and candid moments.
How many reaction photos should I take during toasts?
A practical starting approach is to prioritize frames of reactions from the couple and family over frames of the person speaking. This keeps the story centered on emotion rather than the podium.
Do I need off-camera flash for a wedding reception?
A basic lighting setup with rim light and fill can cover many reception situations without overcomplicating your workflow. A single on-stand light bounced off a wall or ceiling also works well if you're just starting out.
Selected reference links and internal resources
For more on combining photo and video workflow, see our guide to capturing wedding moments. Build out your full-day plan with our wedding photography checklist, and if you're ready to book coverage, visit our wedding services page.