Your wedding morning is a story in itself, and the best wedding day preparation shots capture it completely. Before the first song plays or the first vow is spoken, there are stolen glances in mirrors, laughter over champagne, quiet moments of nerves, and details you spent months choosing. These getting ready wedding photos are not an afterthought. They are often the most personal images from the entire day. This guide gives you a shot list, timing strategy, and setup tips so your photographer walks in ready to capture every moment that matters.
Table of Contents
- Key takeaways
- How to set the stage for great wedding day preparation shots
- 10 must-have wedding day preparation shots
- 1. The dress hanging alone
- 2. The detail flat lay
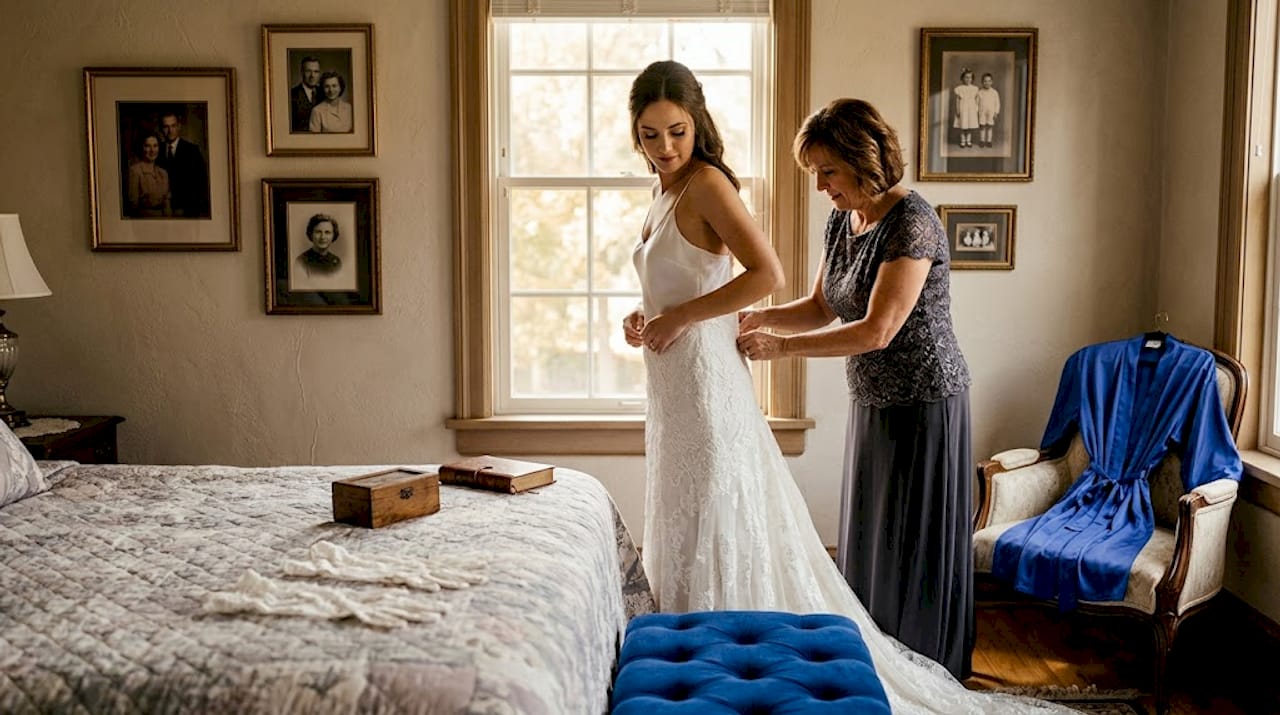
- 3. Getting into the dress
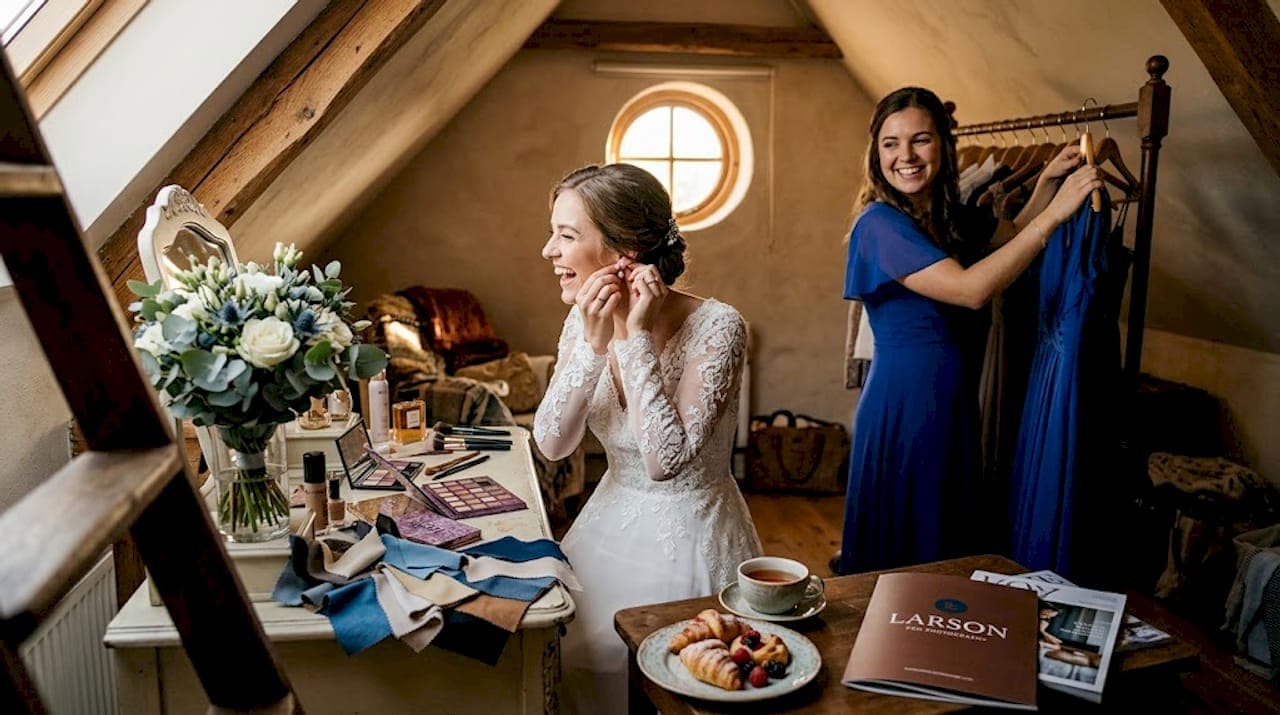
- 4. The makeup finishing touch
- 5. Mirror reflection portrait
- 6. The champagne toast
- 7. Reading the letter
- 8. Parent and close family moments
- 9. Bridal party group portrait
- 10. Leaving for the ceremony
- Coverage level comparison: finding the right prep photography window
- The emergency kit: protecting your prep shots and your mood
- My honest take on capturing the getting-ready story
- Let Larsonprophotography capture your wedding morning
- FAQ
Key takeaways
| Point | Details |
|---|---|
| Timing is everything | Build a 30-minute buffer into your prep timeline so hair and makeup delays don't cost you shots. |
| Light quality changes everything | Position prep activities near north or east-facing windows and turn off overhead fluorescents. |
| Details need their own time | Gather dress, rings, shoes, and invitations together so your photographer can shoot them efficiently. |
| Coverage level shapes the story | Ideal bridal prep photography coverage runs 75 to 90 minutes to allow relaxed, full storytelling. |
| An emergency kit protects the mood | A well-stocked kit stops minor disasters before they disrupt your timeline or your emotions. |
How to set the stage for great wedding day preparation shots
Before your photographer ever clicks the shutter, the room itself is either working for you or against you. A few decisions made the night before can dramatically change the quality of your pre-wedding preparation images.
Start with lighting. Window light is the gold standard for getting ready photos. North-facing windows produce soft, even light that flatters every skin tone. East-facing windows bring warm morning light that feels alive and cinematic. The one thing that hurts preparation photos more than almost anything else is overhead fluorescent lighting. Turn it off. The color cast is unflattering and the shadows land in all the wrong places.
Create a clean zone. Pick one corner of the room, clear it of suitcases, garment bags, and coffee cups, and claim it as your detail and portrait area. Your photographer will thank you, and your photos will look editorial rather than chaotic. Hang the dress on a plain door or wood hanger in front of a window rather than leaving it in a bag.
Group your details the night before. Shoes, rings, invitation suite, jewelry, and any heirlooms should all be in one place. Detail shots work best with clean backgrounds and natural light, so having them organized saves time and produces sharper, more intentional photos.
Here are the key wedding day timeline essentials for prep coverage:
- Block 20 to 30 minutes at the start of the prep window purely for detail shots
- Schedule finishing touches (lipstick, veil, shoes) for the last 15 to 20 minutes of the makeup chair
- Reserve 10 to 15 minutes for solo portraits in window light before anyone else arrives
- Allow time for a relaxed bridal party photo before heading to the ceremony
Pro Tip: Ask your stylist for a realistic finish time the day before and subtract 20 minutes from it. That's your actual buffer. Build your photography timeline from that number, not the scheduled finish time.
The biggest source of morning stress is a timeline that is too tight. Hair and makeup almost always run behind. Padding your schedule is not pessimism. It is the single most effective wedding day preparation tip you can follow.
10 must-have wedding day preparation shots
This is the shot list your photographer needs. Walk them through it before the wedding morning so nothing gets missed.
1. The dress hanging alone
A clean shot of the gown hanging in window light, on its own, before anyone touches it. This is your first detail shot and often one of the most shared images from the day. Use a wooden hanger and find a plain background.
2. The detail flat lay
Shoes, rings, invitation suite, jewelry, perfume bottle, and any heirloom pieces arranged together on a flat surface. Flat lays tell the story of your choices as a couple and give you a single image that contains the whole aesthetic of the day.
3. Getting into the dress
Whether a parent zips you up, a bridesmaid buttons the back, or your partner helps you step in, this moment is full of quiet emotion. The person helping almost always cries. Your photographer should be positioned to catch both faces.
4. The makeup finishing touch
The moment the lipstick goes on or the mascara wand makes its last pass is universally flattering. It also signals the transition from "almost ready" to "done." Shoot it from the side near the window for the cleanest light.
5. Mirror reflection portrait
A well-framed mirror shot showing you looking at yourself captures something vulnerable and honest. This works beautifully as a solo portrait and as a candid moment that did not require posing.
6. The champagne toast
Group your bridal party together with glasses raised before things get too serious. This is one of the most joyful and visually dynamic wedding morning moments in any album. Make sure everyone is actually dressed before this shot.
7. Reading the letter
If you and your partner exchange letters before the ceremony, photograph the reading. Genuine reactions, happy tears, quiet smiles. These are the images couples look at twenty years later. Capturing authentic reactions during prep is what separates documentary coverage from posed portraits.
8. Parent and close family moments
A mother fastening a necklace, a father seeing you for the first time, a sibling adjusting a boutonniere. These small gestures between people who love each other are irreplaceable. Ask your photographer to stay close during these moments without directing them.
9. Bridal party group portrait
A relaxed, laughing group shot of everyone dressed and ready is a wedding album staple. Keep it natural. Tell a joke instead of counting down from three.
"The best group shots happen when everyone forgets the camera is there. Give them something to react to."
10. Leaving for the ceremony
The moment your crew walks out of the hotel or house toward the cars is full of movement and anticipation. Shooting it from outside the door as you step through gives you a natural frame and a sense of journey that no posed shot can replicate.
Pro Tip: For every shot on this list, ask your photographer to shoot a candid version first and a directed version second. Nine times out of ten, the candid is the one you frame.
Coverage level comparison: finding the right prep photography window
Not every couple has the same amount of time. Here is how different coverage windows affect what you get.
| Coverage level | Time block | What you can capture | What you risk missing |
|---|---|---|---|
| Minimum viable | 25 to 35 minutes | Key details, dress shot, one or two candids | Parent moments, group shots, full story flow |
| Standard | 45 to 60 minutes | Details, finishing touches, portraits, one group shot | Relaxed pacing, extended family moments |
| Ideal/full story | 75 to 90 minutes | Everything on the shot list with breathing room | Very little, if timeline is protected |
A minimum of 90 minutes is recommended for bridal preparation photography when you want to capture details, finishing touches, and emotional moments without any rushing. For groom or partner prep, 45 to 60 minutes is typically sufficient.
The math is simple but brutal. Hair and makeup frequently run 15 to 30 minutes over schedule per person. If you have four people in the chair before you and no buffer, your photographer arrives to a room that is still mid-process and half the shots on your list disappear.
Pro Tip: Schedule your photographer to arrive 15 minutes before you think the details will be ready. That window gives them time to assess the light, find the best angles, and start shooting without you having to manage them.
The wedding day timeline tips that matter most are not about squeezing more in. They are about protecting what you already have planned.
The emergency kit: protecting your prep shots and your mood
Nothing derails a beautiful morning faster than a wardrobe malfunction or a mascara crisis with no solution in sight. A well-packed emergency kit is one of the best wedding day preparation tips you can act on weeks before the wedding.
Experts recommend a "big ten" emergency kit that handles 80 to 95% of wedding day mishaps. Here is what belongs in it:
Fashion and clothing fixes:
- Fashion tape and double-sided tape
- Safety pins in multiple sizes
- Stain remover pen
- Needle and thread in colors matching your dress and bridesmaids' gowns
Beauty touch-ups:
- Blotting papers
- Lip color in your exact shade
- Travel hairspray and bobby pins
- Setting powder
Health and comfort:
- Pain reliever
- Blister pads (non-negotiable if your shoes are new)
- Antacids
- Deodorant
Tech and logistics:
- Fully charged power bank
- Clear umbrellas for outdoor moments
- Safety scissors
Comprehensive kits often contain 30 to 47 items and should be pre-positioned at the getting-ready suite, the ceremony site, and the reception venue so they are accessible within 90 seconds.
Designate one organized person to carry and manage the kit. That is not you on your wedding day. Give it to your maid of honor or a trusted family member the night before.
Emergency kits protect the mood as much as they fix problems. When a small disaster gets solved in sixty seconds, the laughter that follows is pure gold for your photographer. The panic that comes without a kit is not.
My honest take on capturing the getting-ready story
I've photographed enough wedding mornings to know that the couples who look back on their getting ready photos with the most joy are the ones who protected their time. Not the ones with the most expensive venue or the largest bridal party.
What I've learned is that the best candid moments cannot be manufactured. They happen in the gaps between the planned shots, when everyone has relaxed and forgotten I'm holding a camera. That only happens when the room is not in crisis mode. A tight timeline kills spontaneity. It turns a morning full of love into a logistical sprint.
I've also seen what happens when detail shots get skipped because time ran out. Couples don't realize how much they'll miss that image of their grandmother's ring or the invitation they spent three months designing until the album arrives and it's not there.
My advice is simple. Build more time than you think you need. Show your photographer your wedding photography checklist ahead of time. Clear the room of clutter the night before. Assign the emergency kit. And then let the morning breathe.
The story of your wedding starts before you walk down the aisle. The photos you take in that getting-ready room are the ones that remind you who you were on the morning you changed everything.
— Todd
Let Larsonprophotography capture your wedding morning
At Larsonprophotography, we treat the getting-ready window as one of the most important parts of your wedding day coverage. We arrive early, assess the light, and work through your shot list without rushing you or your bridal party. Based in San Antonio, we've built our wedding coverage around relaxed, story-driven photography that feels as natural as the moments themselves.
Every couple we work with gets personalized timeline coordination so nothing gets missed and nobody feels rushed. You can explore our wedding photography services to see how we approach pre-ceremony coverage, or visit our client portfolio to see real wedding morning stories we've captured. If you're ready to talk about your date and vision, we'd love to hear from you.
FAQ
How much time should I set aside for wedding prep photos?
Plan for 75 to 90 minutes for full bridal prep photography coverage. Groom or partner prep typically needs 45 to 60 minutes.
What should I do with my details before the photographer arrives?
Gather your dress, rings, shoes, jewelry, and invitation suite in one spot near a window the night before. This saves significant time and produces cleaner, more intentional detail shots.
What is the best light for getting ready photos?
North or east-facing windows provide the most flattering natural light for bridal prep photography. Turn off overhead fluorescent lights before your photographer arrives.
Do I really need a wedding day emergency kit?
Yes. A well-stocked kit solves 80 to 95% of mishaps and keeps your morning on track. Assign it to your maid of honor and place backup kits at the ceremony and reception venues.
When should the photographer arrive for getting ready photos?
Have your photographer arrive at least 15 minutes before your details are ready to shoot. This gives them time to find the best light and set up angles without rushing into the coverage.