
A wedding highlight reel is a short cinematic film that distills your entire wedding day into an emotional, shareable story. Unlike a full-length wedding video, the highlight reel runs between 3 and 8 minutes and functions as the version you will watch repeatedly and send to family across the country. Knowing how to create a wedding highlight reel means understanding two disciplines at once: filmmaking and emotional storytelling. This guide covers both, walking through clip selection, narrative structure, audio mixing, and final export settings so the finished film reflects the day as you actually lived it. Tools like Adobe Premiere Pro, DaVinci Resolve, and Final Cut Pro each handle the technical side. What separates a forgettable video from a film people rewatch is the story you build around the footage.
How to plan and select the right footage for your highlight reel
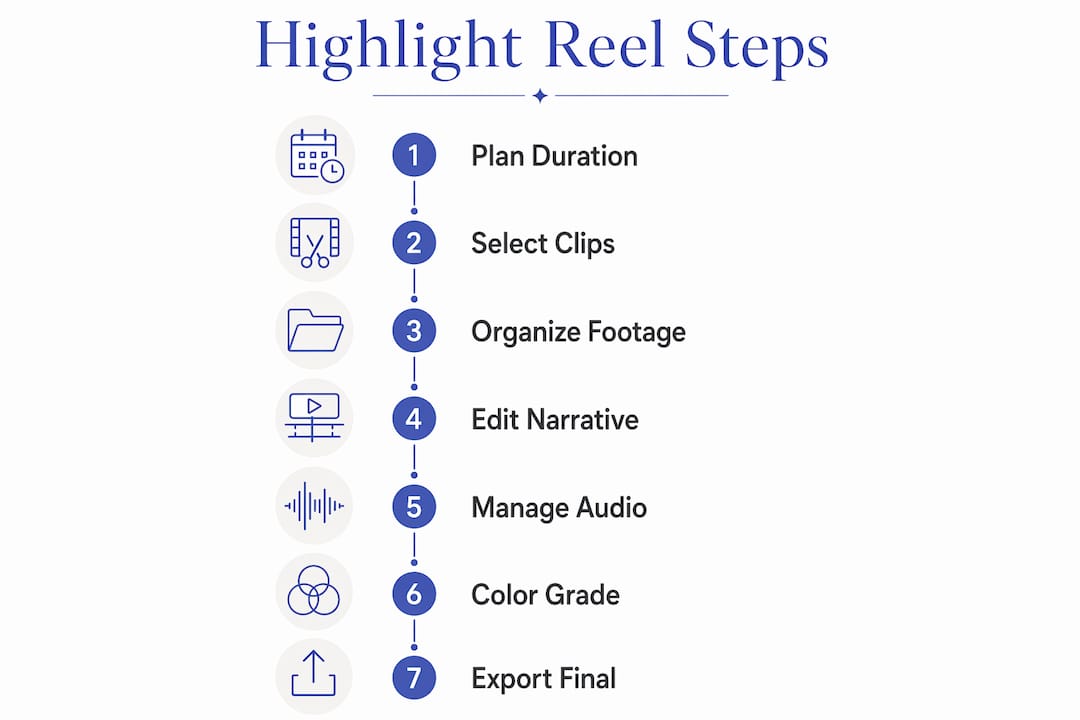
Planning is where most highlight reels succeed or fail before a single cut is made. The first decision is duration. A 3 to 8 minute reel balances emotional depth with the attention span of anyone watching on a phone or laptop. Editors who target the shorter end of that range, around 2 to 5 minutes, tend to produce films with tighter pacing and stronger rewatch value. Longer does not mean more meaningful.

Once you have a target length, map your footage to an emotional arc. The arc follows a natural sequence: preparation and getting ready, the ceremony procession, vows and the first kiss, couple portraits, speeches, and the reception celebration. This sequence mirrors how the day actually felt, which is why it works. Viewers do not need to see every moment. They need to feel the progression.
When choosing which clips to keep, prioritize the following milestones:
- The entrance: First look reactions, the walk down the aisle, and the moment the couple sees each other set the emotional tone.
- Vows and first kiss: These are the emotional center of the film. Every other clip supports them.
- Speeches: A well-chosen 15-second excerpt from a parent or best friend adds depth and humor.
- Reception energy: Dancing, confetti, sparklers, and candid laughter signal celebration and closure.
- Quiet moments: A hand squeeze, a stolen glance, a tear. These are the clips that make people cry.
Organize your raw footage into labeled bins or folders that mirror these story sections before you open your editing timeline. Adobe Premiere Pro's project panel and DaVinci Resolve's media pool both support folder structures that map directly to story beats. This prevents the most common beginner mistake: scrolling through hours of footage with no system.
Pro Tip: Avoid the "everything" mindset. If a clip does not advance the emotional story or reveal character, cut it. The strongest clips are the ones that make you feel something on first watch, not the ones that document every detail.
What editing techniques create a compelling narrative and pacing?
The biggest differentiator in any highlight film is storytelling and pacing, not software effects or color grades. A technically perfect film with no emotional arc feels cold. A slightly rough film with a clear story and well-chosen music feels unforgettable. Structure your edit around a beginning, a climax, and a resolution.
Follow this sequence when building your first cut:
- Lay down your audio first. Choose your music track before placing a single video clip. Music sets the emotional tempo for every cut you make after it.
- Mark your emotional peaks. In Adobe Premiere Pro or Final Cut Pro, use markers to flag the musical moments where the energy rises or drops. These are your cut points.
- Lock your hero clips. Place the vows, first kiss, and one or two reaction shots at the emotional peaks you marked. Everything else fills the space around them.
- Build the opening. Use preparation footage and establishing shots to introduce the couple and the setting. Keep this section moving quickly.
- Add B-roll and transitions. Cutaways of flowers, rings, venue details, and candid guest reactions add texture without slowing the story.
- Vary your shot lengths. A sequence of five long shots in a row creates visual fatigue. Alternate between wide establishing shots, medium shots, and tight close-ups to maintain visual rhythm.
- Cut on the beat. Music beats aligned with visual cuts create a subconscious sense of momentum. Editors who mark beats before placing clips consistently produce tighter films.
Resist the urge to add heavy transitions, glitch effects, or slow-motion on every clip. These tools exist to serve the story, not replace it. One well-placed slow-motion shot of the first kiss lands harder than five slow-motion clips scattered across the film.
Pro Tip: Lock your emotional peaks first before touching transitions or B-roll. If the core story does not work without effects, adding effects will not fix it.
How to manage audio for clear and emotional wedding highlight reels
Audio is the element most couples underestimate and most videographers obsess over. Clear audio for vows and speeches is non-negotiable. A beautiful image paired with muffled audio feels amateurish. A simple image paired with crystal-clear vows feels cinematic.
Best practices for capturing and managing wedding audio include:
- Use multiple capture sources. A lavalier microphone on the officiant or groom, a backup recorder on the altar, and the venue's own sound system feed give you three separate audio tracks to work with in post.
- Coordinate with the DJ. Ask the DJ to lower music levels during toasts and speeches. This single step prevents the most common audio problem in reception footage.
- Capture ambient sound. Room tone, crowd laughter, and natural venue sounds add authenticity that music alone cannot replicate. Record 30 to 60 seconds of ambient sound at each location.
- Sync audio in post immediately. Before any creative editing, sync all your audio sources to the video timeline. DaVinci Resolve's Fairlight audio panel and Adobe Premiere Pro's Essential Sound panel both handle multi-track sync efficiently.
- Apply noise reduction selectively. iZotope RX and Adobe Audition both offer noise reduction tools that clean up wind, HVAC hum, and crowd noise without degrading voice quality.
Treating audio as a parallel timeline means keeping vows, speeches, and ambient sound on separate tracks rather than mixing everything into one. This approach makes it far easier to adjust music levels without accidentally affecting dialogue.
Pro Tip: Set your dialogue tracks to peak around negative 12 dB and your music tracks to sit between negative 18 and negative 24 dB. This ratio keeps voices intelligible while music supports the emotion rather than competing with it.
How to finalize your reel with color grading and export settings
Color grading is the last creative step and the one that gives your highlight reel a unified visual identity. The goal is not a dramatic look. The goal is consistency. Every clip should feel like it belongs to the same film, shot in the same light, on the same day.
Start with basic color correction before any creative grading. Correct exposure, white balance, and contrast clip by clip so your footage starts from a neutral baseline. Then apply a consistent look using a LUT (Look Up Table) in DaVinci Resolve or a color preset in Adobe Premiere Pro's Lumetri Color panel. LUTs from providers like Ground Control or IWLTBAP give editors a reliable starting point that can be adjusted per clip.
Skin tone accuracy matters more than any other color decision. Oversaturated or magenta-shifted skin tones read as unprofessional immediately. Use the vectorscope in DaVinci Resolve to check that skin tones fall along the skin tone indicator line before exporting.
For transitions, use cuts and simple dissolves as your default. J-cuts and L-cuts, where audio from the next clip begins before the picture cuts, create smooth, professional-feeling transitions without calling attention to themselves.
Export settings vary by platform. The table below covers the most common output scenarios:
| Output format | Resolution | Frame rate | Notes |
|---|---|---|---|
| Full highlight reel (web) | 1920x1080 | 24fps or 30fps | H.264 or H.265, high bitrate |
| Social media short (horizontal) | 1920x1080 | 30fps | Under 60 seconds for Instagram Reels |
| Social media short (vertical) | 1080x1920 | 30fps | 30-second social edits ideal for Stories |
| 4K archive version | 3840x2160 | 24fps | ProRes or DNxHR for long-term storage |
Pro Tip: Use proxy editing in Adobe Premiere Pro or DaVinci Resolve when working with 4K footage. Proxies cut render times significantly and prevent timeline lag, which means you spend more time making creative decisions and less time waiting for your computer.
Key takeaways
A compelling wedding highlight reel requires emotional clip selection, music-driven pacing, clean multi-source audio, and consistent color grading across every output format.
| Point | Details |
|---|---|
| Target 3 to 8 minutes | Shorter reels get more rewatches; aim for 2 to 5 minutes for social sharing. |
| Build around an emotional arc | Sequence clips from preparation through reception to mirror how the day felt. |
| Lock emotional peaks first | Place hero clips at music peaks before adding B-roll or transitions. |
| Treat audio as its own timeline | Separate dialogue, ambient sound, and music tracks for cleaner mixing. |
| Export multiple versions | Deliver a full reel, a horizontal social cut, and a vertical short for maximum reach. |
Why emotional honesty beats technical perfection every time
I have edited enough wedding films to know that the couples who are happiest with their highlight reels are not the ones who asked for the most effects. They are the ones who trusted the story. The reel that makes a mother cry at the kitchen table is almost never the one with the most cinematic color grade. It is the one where you can hear her son's voice crack during his vows.
The hardest thing to teach new videographers, and honestly the hardest thing to remember yourself, is that restraint is a skill. Every time you resist adding a lens flare or a dramatic transition, you are making a choice to let the moment speak. That choice compounds across a five-minute film. By the end, the difference between a restrained edit and an effects-heavy one is enormous.
For couples working with a videographer, the most useful thing you can do before the wedding is share reference films you love and be specific about why you love them. "We want something emotional" is not enough direction. "We love this film because the audio from the ceremony carries through the whole reel and the music never overpowers the voices" gives your editor something concrete to work toward. That kind of collaboration produces films that feel personal rather than generic.
One more thing: give the editing process time. Typical delivery timelines run 3 to 5 weeks for a reason. Rushing a first cut produces a film that documents your wedding. Sitting with the footage, revisiting it, and making deliberate choices produces a film that captures it.
— Todd
Let Larsonprophotography tell your wedding story
At Larsonprophotography, we specialize in cinematic wedding videography for couples in San Antonio and beyond. Every highlight reel we create is built around your specific story, not a template. We capture the vows, the laughter, the quiet moments between the big ones, and we edit them into a film you will want to watch every anniversary. Our packages include engagement sessions that give us a chance to understand how you move together on camera before the wedding day. Browse our client work to see how we approach storytelling, or visit our engagement sessions page to learn about booking options. We would love to be part of your day.
FAQ
How long should a wedding highlight reel be?
A wedding highlight reel should run between 3 and 8 minutes for most sharing contexts. Editors targeting social media often produce a shorter 30-second version alongside the full film.
What clips should I include in a wedding highlight reel?
Prioritize the entrance, vows, first kiss, one or two speech excerpts, and candid reception moments. The strongest clips are the ones that convey genuine emotion rather than simply documenting an event.
What software is best for editing a wedding highlight reel?
Adobe Premiere Pro, DaVinci Resolve, and Final Cut Pro are the three most widely used professional tools. DaVinci Resolve is free and includes a full-featured color grading suite, making it a strong choice for editors focused on visual consistency.
How do I get clear audio for vows and speeches?
Use a lavalier microphone on the officiant or groom, a backup recorder near the altar, and coordinate with the DJ to lower music during toasts. Multiple audio sources give you fallback options if one recording fails.
Can I create a wedding highlight reel from guest footage?
Yes, but visual consistency is the main challenge. Ask guests to record horizontal video and apply unified color correction in post to prevent jarring shifts between clips from different phones and cameras.